

3.4 - Gradients and Interpolation
What We're Learning
In the real world, colors are rarely static. The sky shifts from deep azure to pale cyan; a metal pipe has a bright highlight that fades into shadow; a sunset paints the clouds in bands of orange, pink, and purple. To replicate this in a shader, we need to master gradients.
At their core, gradients are about interpolation: the math of smoothly blending from one value to another. In previous articles, we used interpolation to move things. Now, we apply those same principles to color.
In this article, you will learn:
The Logic of
mix(): How to blend any two values - colors, positions, or numbers - using a control factor.Linear Gradients: Using UV coordinates to create horizontal, vertical, and diagonal color ramps.
smoothstep() Basics: How to create buttery-smooth transitions that feel organic rather than mechanical.
Radial and Angled Gradients: Moving beyond simple lines to create circles, cones, and sweeping angles.
Banding and Dithering: Why gradients sometimes look "stepped" on monitors and how to fix it with noise.
The Aurora Shader: A complete project blending noise and gradients to create a dynamic northern lights effect.
The Foundation: Linear Interpolation
Before we paint a sunset, we must understand the brush. In WGSL, that brush is the mix() function.
In mathematics, this operation is often called Linear Interpolation (or lerp). It calculates a value between a start point and an end point based on a percentage t.
Understanding mix()
The function signature is:
let result = mix(start, end, t);
Think of t as a slider or a percentage from 0.0 to 1.0.
When
tis 0.0, you get 100% of thestartvalue.When
tis 1.0, you get 100% of theendvalue.When
tis 0.5, you get a perfect 50/50 blend.
Mathematically, the GPU performs this calculation:result = start * (1.0 - t) + end * t
Visualizing the Slider

Interpolating Colors
Because colors in WGSL are just vectors (vec3<f32> or vec4<f32>), mix() works on them exactly the same way it works on single numbers. It blends the Red, Green, and Blue channels independently.
let red = vec3<f32>(1.0, 0.0, 0.0);
let blue = vec3<f32>(0.0, 0.0, 1.0);

// 50% Red + 50% Blue = Purple
let purple = mix(red, blue, 0.5);
// Result: vec3<f32>(0.5, 0.0, 0.5)
A Note on Color Mud:
Standard RGB interpolation is "linear," but human eyes don't perceive color linearly. If you mix pure Red and pure Green, the mathematical midpoint is a dark, murky olive color, not the bright Yellow you might expect. For simple gradients, this is fine, but if your gradients look "muddy" in the middle, it's often because of this limitation in the RGB color space.
Linear Gradients with UV Coordinates
The most common "slider" we have in a fragment shader is the UV coordinate system. Since UVs naturally range from 0.0 to 1.0 across the mesh, they plug directly into the t parameter of mix().
Horizontal Gradient
To create a gradient from left to right, we use the U coordinate (uv.x).
#import bevy_pbr::forward_io::VertexOutput

@fragment
fn fragment(in: VertexOutput) -> @location(0) vec4<f32> {
    let color_left = vec3<f32>(1.0, 0.0, 0.0);  // Red
    let color_right = vec3<f32>(0.0, 0.0, 1.0); // Blue

    // Use U coordinate as our slider (0.0 at left, 1.0 at right)
    let t = in.uv.x;

    let color = mix(color_left, color_right, t);

    return vec4<f32>(color, 1.0);
}
Result:

Vertical Gradient
To go from bottom to top, we use the V coordinate (uv.y).
@fragment
fn fragment(in: VertexOutput) -> @location(0) vec4<f32> {
    let color_bottom = vec3<f32>(0.2, 0.2, 0.2); // Dark Gray
    let color_top = vec3<f32>(0.5, 0.7, 1.0);    // Sky Blue

    // Use V coordinate (0.0 at bottom, 1.0 at top)
    let t = in.uv.y;

    let color = mix(color_bottom, color_top, t);

    return vec4<f32>(color, 1.0);
}
Diagonal Gradient
A diagonal gradient requires a t value that increases as we move both right and up. We can achieve this by averaging the coordinates.
@fragment
fn fragment(in: VertexOutput) -> @location(0) vec4<f32> {
    let color_a = vec3<f32>(1.0, 0.0, 0.0);
    let color_b = vec3<f32>(0.0, 0.0, 1.0);

    // Average U and V.
    // Bottom-Left (0,0) -> 0.0
    // Top-Right (1,1) -> 1.0
    let t = (in.uv.x + in.uv.y) * 0.5;

    let color = mix(color_a, color_b, t);

    return vec4<f32>(color, 1.0);
}
Controlling the Range
What if you want the gradient to start 20% of the way in and finish 80% of the way across? We need to manipulate our t value before plugging it into mix.
We remap the range using simple math: (value - start) / (end - start).
@fragment
fn fragment(in: VertexOutput) -> @location(0) vec4<f32> {
    let color_bg = vec3<f32>(0.0, 0.0, 0.0); // Black background
    let color_fg = vec3<f32>(1.0, 1.0, 0.0); // Yellow foreground

    // Define the start and end of the gradient in UV space
    let start = 0.2;
    let end = 0.8;

    // Remap uv.x to our new 0.0-1.0 range
    let t_raw = (in.uv.x - start) / (end - start);

    // Essential! Clamp the value.
    // Without clamp, mix() would extrapolate beyond colors A and B,
    // potentially creating negative colors or hyper-bright values.
    let t = clamp(t_raw, 0.0, 1.0);

    let color = mix(color_bg, color_fg, t);

    return vec4<f32>(color, 1.0);
}
Repeating Gradients
In the previous article, we used fract() to repeat patterns. We can do the same for gradients to create soft, repeating bands.
@fragment
fn fragment(in: VertexOutput) -> @location(0) vec4<f32> {
    let color_a = vec3<f32>(0.0, 0.0, 0.0);
    let color_b = vec3<f32>(1.0, 1.0, 1.0);

    // Scale UVs by 5.0, then take the fractional part.
    // This creates a sawtooth wave: 0->1, 0->1, 0->1... five times.
    let t = fract(in.uv.x * 5.0);

    let color = mix(color_a, color_b, t);

    return vec4<f32>(color, 1.0);
}
The smoothstep() Function
Linear interpolation is useful, but it often looks mechanical or "robotic." In the real world, transitions rarely happen at a constant speed; they accelerate and decelerate. Shadows have soft edges, and lights have a "hotspot" that fades out gradually.
To achieve this organic look, we use the smoothstep() function. It is arguably the most important function in procedural shader programming after mix().
Understanding smoothstep
The function takes three arguments:
let result = smoothstep(edge0, edge1, x);
It returns a value between 0.0 and 1.0, based on where x lies relative to edge0 and edge1.
Below the Lower Edge: If
xis less thanedge0, it returns 0.0.Above the Upper Edge: If
xis greater thanedge1, it returns 1.0.In Between: If
xis between the edges, it performs a smooth Hermite interpolation (an S-shaped curve). It starts slow, speeds up in the middle, and slows down at the end.
Visual Comparison
Imagine we are fading from black to white as UV.x goes from 0.0 to 1.0.
Linear (t = x): The change is constant. It looks like a stiff, perfect ramp.0.0 ➔ 0.25 ➔ 0.5 ➔ 0.75 ➔ 1.0
Smoothstep (t = smoothstep(0.0, 1.0, x)): The change eases in and eases out. It creates more contrast in the middle and softer transitions at the ends.0.0 ➔ 0.11 ➔ 0.5 ➔ 0.89 ➔ 1.0
Using smoothstep with mix
The real power comes when you use the result of smoothstep as the t (control) value for your mix function.
@fragment
fn fragment(in: VertexOutput) -> @location(0) vec4<f32> {
    let color_a = vec3<f32>(0.0, 0.0, 0.0);
    let color_b = vec3<f32>(1.0, 1.0, 1.0);

    // Define the transition zone: from 30% to 70% of the screen
    let edge0 = 0.3;
    let edge1 = 0.7;

    // Calculate the curve
    let t = smoothstep(edge0, edge1, in.uv.x);

    // Blend colors using the curved t
    let color = mix(color_a, color_b, t);

    return vec4<f32>(color, 1.0);
}
What happens here:
Left 30%: Pure
color_a(Black).Right 30%: Pure
color_b(White).Middle 40%: A smooth, contrast-rich transition from Black to White.
Useful Patterns
1. Inverting the Control
Often you want 1.0 at the start and 0.0 at the end (like a light fading out). You can do this in two ways:
- The Math Way: Generate a normal 0-to-1 curve, then subtract it from 1.0.
let t = 1.0 - smoothstep(0.0, 1.0, x);
- The Shorthand Way: Simply swap the edges.
let t = smoothstep(1.0, 0.0, x);
Both lines of code do exactly the same thing. Use whichever one makes more sense to you!
2. Hard Edges
If edge0 and edge1 are very close together, the smooth transition tightens until it looks like a hard line. This is how we do anti-aliasing!
// A sharp, but slightly anti-aliased line at 0.5
let line = smoothstep(0.49, 0.51, in.uv.x);
Radial Gradients
Now that we understand interpolation and smoothing, let's leave the grid behind. Radial gradients emanate from a center point, creating circles, glows, and vignettes.
The Math: Distance
The engine of a radial gradient is the distance() function (or length()). We measure how far the current pixel (UV) is from a center point.
let center = vec2<f32>(0.5, 0.5);
let dist = distance(in.uv, center); // or length(in.uv - center)
In the center, dist is 0.0. At the edges of a square (0.5 units away), dist is 0.5. In the corners, dist is roughly 0.707 (the square root of 0.5² + 0.5²).
Basic Radial Gradient
@fragment
fn fragment(in: VertexOutput) -> @location(0) vec4<f32> {
    let center = vec2<f32>(0.5, 0.5);

    // Calculate distance
    let dist = distance(in.uv, center);

    // 1. Simple Linear Falloff
    // We want the center to be White (1.0) and the edge to be Black (0.0).
    // Since dist goes 0->0.5, we multiply by 2.0 to map it to 0->1 range.
    // Then we invert it (1.0 - val) to make the center bright.
    let brightness = 1.0 - (dist * 2.0);

    let color = vec3<f32>(brightness); // Grayscale result

    return vec4<f32>(color, 1.0);
}
Result: A cone-like gradient. It looks sharp and pointy in the center, like a pyramid viewed from above.
Soft Glow with smoothstep
The linear version usually looks too "pointy." To make it look like a glowing sphere or a spotlight, we use smoothstep.
@fragment
fn fragment(in: VertexOutput) -> @location(0) vec4<f32> {
    let center = vec2<f32>(0.5, 0.5);
    let dist = distance(in.uv, center);

    // Create a glow that starts fading immediately (0.0)
    // and vanishes completely at radius 0.5.
    // Note: We flip the edges! smoothstep(0.5, 0.0, dist)
    // This is a shorthand for: 1.0 - smoothstep(0.0, 0.5, dist)
    let glow = smoothstep(0.5, 0.0, dist);

    let color_center = vec3<f32>(1.0, 0.8, 0.2); // Warm Orange
    let color_edge = vec3<f32>(0.1, 0.0, 0.0);   // Dark Red

    let color = mix(color_edge, color_center, glow);

    return vec4<f32>(color, 1.0);
}
Why flip the smoothstep arguments? smoothstep(0.5, 0.0, dist) is a valid trick.
If
distis 0.0 (center), it returns 1.0.If
distis 0.5 (edge), it returns 0.0.
It saves us from writing 1.0 - ... and often easier to read: "Map 0.5 to 0, and 0.0 to 1".
Off-Center Gradient
You aren't stuck in the middle. By changing the center variable, you can move the "light source."
@fragment
fn fragment(in: VertexOutput) -> @location(0) vec4<f32> {
    // Move center to top-right
    let center = vec2<f32>(0.8, 0.8);
    let dist = distance(in.uv, center);

    // Tighter glow radius (0.4)
    let glow = smoothstep(0.4, 0.0, dist);

    return vec4<f32>(vec3<f32>(glow), 1.0);
}
Animating the Gradient
Since mix and smoothstep are just math, we can animate the parameters over time.
@fragment
fn fragment(in: VertexOutput) -> @location(0) vec4<f32> {
    // Animate the center point in a circle
    let center = vec2<f32>(
        0.5 + cos(material.time) * 0.3,
        0.5 + sin(material.time) * 0.3
    );

    let dist = distance(in.uv, center);

    // Pulsate the radius
    let radius = 0.3 + sin(material.time * 5.0) * 0.05;

    let glow = smoothstep(radius, 0.0, dist);

    return vec4<f32>(vec3<f32>(glow), 1.0);
}
Multi-Stop Gradients
So far, we've only mixed two colors. But what if you want a sunset that goes Blue ➔ Pink ➔ Orange? mix() only takes two inputs, so we need to chain them together using logic.
The "if/else" Approach
The simplest way to handle three colors is to split your UV space in half.
If we are on the left side (0.0 to 0.5), mix Color A and Color B.
If we are on the right side (0.5 to 1.0), mix Color B and Color C.
@fragment
fn fragment(in: VertexOutput) -> @location(0) vec4<f32> {
    let color_a = vec3<f32>(0.0, 0.0, 1.0); // Blue
    let color_b = vec3<f32>(1.0, 0.0, 1.0); // Pink
    let color_c = vec3<f32>(1.0, 0.5, 0.0); // Orange

    let t = in.uv.y; // Vertical gradient

    var color: vec3<f32>;

    // We split the screen at 0.5
    if (t < 0.5) {
        // We are in the bottom half.
        // We need to remap t from [0.0, 0.5] to [0.0, 1.0]
        // so the mix works correctly.
        // formula: t / max_value
        let local_t = t / 0.5;
        color = mix(color_a, color_b, local_t);
    } else {
        // We are in the top half.
        // Remap t from [0.5, 1.0] to [0.0, 1.0]
        // formula: (t - start) / (end - start)
        let local_t = (t - 0.5) / 0.5;
        color = mix(color_b, color_c, local_t);
    }

    return vec4<f32>(color, 1.0);
}
Alternative: The select() Function
WGSL provides a built-in function called select(false_value, true_value, condition) that picks a value without using an if statement. This is often preferred in shader programming because it is concise and avoids "branching" (splitting the code path), which can sometimes optimize better on GPUs.
We could rewrite the logic above like this:
// Calculate both possibilities
let mix_1 = mix(color_a, color_b, t / 0.5);
let mix_2 = mix(color_b, color_c, (t - 0.5) / 0.5);

// Pick the correct one based on the boolean condition
let color = select(mix_2, mix_1, t < 0.5);
The smoothstep Blending Approach
For a softer, more organic look without hard math logic, you can calculate a "weight" for each color band using smoothstep and add them together.
@fragment
fn fragment(in: VertexOutput) -> @location(0) vec4<f32> {
    let t = in.uv.x;

    // Define colors
    let deep_blue = vec3<f32>(0.1, 0.1, 0.4);
    let purple    = vec3<f32>(0.5, 0.0, 0.5);
    let gold      = vec3<f32>(1.0, 0.8, 0.0);

    // Start with the base color
    var final_color = deep_blue;

    // As we pass 0.3, fade in Purple
    let t_purple = smoothstep(0.3, 0.5, t);
    final_color = mix(final_color, purple, t_purple);

    // As we pass 0.6, fade in Gold
    let t_gold = smoothstep(0.6, 0.8, t);
    final_color = mix(final_color, gold, t_gold);

    return vec4<f32>(final_color, 1.0);
}
This approach essentially layers the gradients on top of each other. It's much cleaner to read and easier to tweak.
Angled Gradients with Vector Math
We can make horizontal, vertical, and radial gradients... but what about a gradient at a 45-degree angle? Or 30 degrees?
To do this, we need a tiny bit of vector math: the Dot Product.
The Logic: Projection
Imagine a line pointing in the direction you want your gradient to go. To color a specific pixel, we need to know: "How far along this line is this pixel?"
The dot(A, B) function answers exactly this question. It "projects" vector A onto vector B.
Direction: We define a direction vector (e.g., pointing 45 degrees up-right).
Position: We take the pixel's UV position relative to the center.
Projection: dot(position, direction) gives us a single number representing how far along that direction the pixel lies.
Implementation
@fragment
fn fragment(in: VertexOutput) -> @location(0) vec4<f32> {
    // 1. Define the angle (in radians)
    // 45 degrees = PI / 4
    let angle = 0.785;

    // Convert angle to a direction vector (x=cos, y=sin)
    let dir = vec2<f32>(cos(angle), sin(angle));

    // 2. Center the UVs (so 0,0 is in the middle of the mesh)
    let centered_uv = in.uv - 0.5;

    // 3. Project the position onto the direction
    // This returns a value roughly between -0.7 and 0.7
    let projection = dot(centered_uv, dir);

    // 4. Remap to 0.0 - 1.0 range for mixing
    // We add 0.5 to re-center it, and scale it slightly to fit
    let t = clamp(projection + 0.5, 0.0, 1.0);

    // 5. Mix!
    let color = mix(
        vec3<f32>(1.0, 0.0, 0.0), // Red
        vec3<f32>(0.0, 0.0, 1.0), // Blue
        t
    );

    return vec4<f32>(color, 1.0);
}
Why is this powerful?
Because angle is just a number, you can pass it in as a uniform or animate it using material.time. This allows you to create spinning gradients like radar sweeps or rotating lights with zero extra effort.
Dithering Techniques
You might notice that your beautiful smooth gradients sometimes look like a series of ugly bands or steps, especially in dark areas. This is called Color Banding.
Why Banding Happens
Banding occurs because monitors have limited precision. A standard monitor uses 8 bits per color channel, meaning it can only display 256 shades of Red, Green, or Blue.
If you stretch a gradient from Black to Dark Blue (0.0 to 0.1) across 1000 pixels, you only have about 25 shades available to cover that distance. Each shade will span roughly 40 pixels, creating visible "steps."
The Solution: Dithering
Dithering is a trick from the days of print media. By adding controlled noise to the image, we break up the hard edges between bands. Our eyes blend the noise together, creating the illusion of a smoother gradient.
1. Simple Random Dithering
The easiest method is to add a tiny amount of random noise to each pixel.
We first need a "pseudo-random" number generator. Since shaders are deterministic, we use a mathematical function that looks random.
// A standard "hash" function for shaders.
// It takes a 2D coordinate and returns a pseudo-random value between 0.0 and 1.0.
fn hash(p: vec2<f32>) -> f32 {
    let p3 = fract(vec3<f32>(p.x, p.y, p.x) * 0.1031);
    let dot_product = dot(p3, vec3<f32>(p3.y, p3.z, p3.x) + 33.33);
    return fract((p3.x + p3.y) * dot_product);
}

@fragment
fn fragment(in: VertexOutput) -> @location(0) vec4<f32> {
    // Create a smooth gradient susceptible to banding
    let t = in.uv.x;
    let color = mix(
        vec3<f32>(0.0, 0.0, 0.05), // Very dark blue
        vec3<f32>(0.0, 0.0, 0.2),  // Slightly lighter blue
        t
    );

    // Calculate Noise
    // We multiply UV by a large number so the noise is per-pixel, not stretched
    let random_val = hash(in.uv * 1000.0);

    // Scale the noise.
    // 1.0 / 255.0 represents the smallest possible color step on a monitor.
    // We subtract 0.5 so the noise averages out to 0.
    let dither_strength = 1.0 / 255.0;
    let dither = (random_val - 0.5) * dither_strength;

    // Add the noise to the color
    return vec4<f32>(color + dither, 1.0);
}
2. Ordered (Bayer) Dithering
Random noise can sometimes look like "film grain" or static. Ordered Dithering uses a specific grid pattern (a Bayer Matrix) to offset pixels in a checkerboard-like fashion. This looks much cleaner and more stable.
// Returns a value from a 4x4 Bayer Matrix
fn bayer_dither(position: vec4<f32>) -> f32 {
    let x = u32(position.x) % 4u;
    let y = u32(position.y) % 4u;
    let index = y * 4u + x;

    // The 4x4 Bayer Matrix pattern
    var matrix = array<f32, 16>(
         0.0,  8.0,  2.0, 10.0,
        12.0,  4.0, 14.0,  6.0,
         3.0, 11.0,  1.0,  9.0,
        15.0,  7.0, 13.0,  5.0
    );

    return matrix[index] / 16.0;
}

@fragment
fn fragment(in: VertexOutput) -> @location(0) vec4<f32> {
    let t = in.uv.x;
    let color = mix(vec3<f32>(0.0), vec3<f32>(0.1), t);

    // Use screen-space coordinates (in.clip_position) for the dither pattern
    // so the pattern stays crisp even if the object moves.
    let bayer_val = bayer_dither(in.clip_position);

    let dither_strength = 1.0 / 255.0;
    let dither = (bayer_val - 0.5) * dither_strength;

    return vec4<f32>(color + dither, 1.0);
}
Metallic and Iridescent Effects
Gradients aren't just for 2D patterns. In 3D rendering, gradients are fundamental to creating the look of complex materials like metal or oil.
The Fresnel Gradient
Metallic and shiny surfaces look different depending on the angle you view them from. Surfaces facing away from you (the edges of a sphere) tend to be more reflective than surfaces facing directly at you. This is called the Fresnel Effect.
We can calculate this "grazing angle" using the dot product between the surface Normal and the View Direction.
@fragment
fn fragment(in: VertexOutput) -> @location(0) vec4<f32> {
    // 1. Get standard vectors
    let normal = normalize(in.world_normal);
    // Calculate direction from camera to pixel
    // (Assuming we pass camera_position as a uniform, or derive it)
    let view_dir = normalize(in.world_position - camera_position);
    // Note: In real code, View Dir is usually (Camera - Position) to point towards camera.
    // Let's fix that direction:
    let to_camera = normalize(camera_position - in.world_position);

    // 2. Calculate alignment
    // dot() is 1.0 if looking straight at surface, 0.0 if looking at edge.
    let alignment = max(0.0, dot(normal, to_camera));

    // 3. Invert it to get the "Edge Factor"
    // 0.0 at center, 1.0 at edge.
    let fresnel = 1.0 - alignment;

    // 4. Sharpen the gradient
    // Raising to a power (typically 3.0 to 5.0) creates that distinct "rim light" look
    let rim_light = pow(fresnel, 3.0);

    // 5. Mix colors based on viewing angle
    let center_color = vec3<f32>(0.0, 0.0, 0.5); // Dark Blue
    let edge_color = vec3<f32>(0.0, 1.0, 1.0);   // Bright Cyan

    let color = mix(center_color, edge_color, rim_light);

    return vec4<f32>(color, 1.0);
}
Iridescence (Holographic Effects)
By mapping that Fresnel gradient to a spectrum of colors instead of just two, we can simulate iridescent materials like bubbles, oil slicks, or holographic stickers.
fn rainbow_gradient(t: f32) -> vec3<f32> {
    // A cosine-based palette technique (Procedural Color Palette)
    // It cycles R, G, and B waves at different offsets.
    let a = vec3<f32>(0.5, 0.5, 0.5);
    let b = vec3<f32>(0.5, 0.5, 0.5);
    let c = vec3<f32>(1.0, 1.0, 1.0);
    let d = vec3<f32>(0.0, 0.33, 0.67);

    return a + b * cos(6.28318 * (c * t + d));
}

@fragment
fn fragment(in: VertexOutput) -> @location(0) vec4<f32> {
    let normal = normalize(in.world_normal);
    let to_camera = normalize(camera_position - in.world_position);
    let fresnel = 1.0 - max(0.0, dot(normal, to_camera));

    // Use the fresnel factor to sample a rainbow
    let color = rainbow_gradient(fresnel);

    return vec4<f32>(color, 1.0);
}
This creates a surface that shifts color wildly as you move the camera around it.
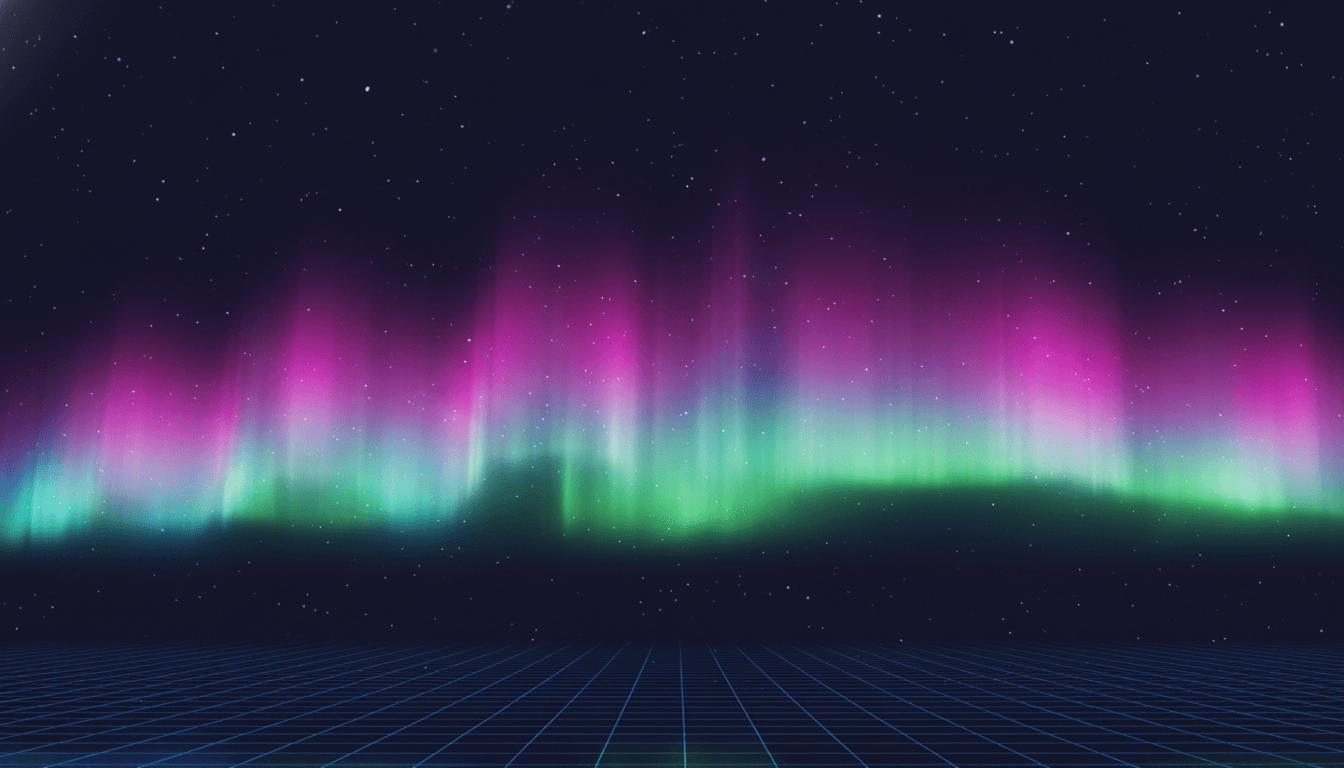
Complete Example: Aurora Borealis Shader
To bring everything we've learned together, we will build a shader for one of nature's most beautiful gradients: the Aurora Borealis.
Unlike the simple gradients we've made so far, an aurora is dynamic. It moves, shimmers, and folds. To achieve this look without using textures, we need to combine gradients with noise and coordinate distortion.
Our Goal
We want to create a "curtain" of light that hangs in the sky.
Shape: It should look like vertical rays or folds.
Color: It should transition from green at the bottom (oxygen) to purple at the top (nitrogen).
Movement: The curtain should wave slowly, while the internal rays shimmer quickly.
The Shader (assets/shaders/d03_04_aurora.wgsl)
This shader relies on a technique called Domain Distortion. Instead of drawing noise directly on the standard grid, we first "bend" the coordinate system into a curve. When we draw vertical lines on this bent grid, they appear to wind back and forth like a curtain.
The fragment shader creates the effect in five distinct steps:
Curtain Shape: We offset the Y coordinate based on a sine wave of the X coordinate. This creates the winding path.
Ray Generation: We generate noise using a coordinate system that is heavily stretched on the Y-axis. This turns what would be "blobs" of noise into long vertical streaks.
Vertical Masking: We use smoothstep to fade the aurora out at the bottom and top, ensuring it blends naturally into the sky.
Color Gradient: We map the Y (altitude) coordinate to a color gradient, blending from the base color to the top color.
Composition: We multiply the color, the rays, and the mask together to get the final glowing result.
#import bevy_pbr::forward_io::VertexOutput
#import bevy_pbr::mesh_view_bindings::globals
#import bevy_pbr::mesh_functions::{get_world_from_local, mesh_position_local_to_world}
#import bevy_pbr::view_transformations::position_world_to_clip

struct AuroraMaterial {
    base_color: vec4<f32>,
    top_color: vec4<f32>,
    speed: f32,
    curtain_waviness: f32,
    ray_density: f32,
}

@group(2) @binding(0)
var<uniform> material: AuroraMaterial;

struct Vertex {
    @builtin(instance_index) instance_index: u32,
    @location(0) position: vec3<f32>,
    @location(1) normal: vec3<f32>,
    @location(2) uv: vec2<f32>,
};

@vertex
fn vertex(vertex: Vertex) -> VertexOutput {
    var out: VertexOutput;

    // Standard Bevy vertex transformation
    let model = get_world_from_local(vertex.instance_index);
    let world_position = mesh_position_local_to_world(model, vec4<f32>(vertex.position, 1.0));

    out.world_position = world_position;
    out.world_normal = vertex.normal;
    out.uv = vertex.uv;
    out.position = position_world_to_clip(world_position.xyz);

    return out;
}

// A simple pseudo-random hash function
fn hash(p: vec2<f32>) -> f32 {
    let p3 = fract(vec3<f32>(p.x, p.y, p.x) * 0.1031);
    let dot_product = dot(p3, vec3<f32>(p3.y, p3.z, p3.x) + 33.33);
    return fract((p3.x + p3.y) * dot_product);
}

// Value Noise: Smoothly interpolated random values
fn noise(p: vec2<f32>) -> f32 {
    let i = floor(p);
    let f = fract(p);
    let u = f * f * (3.0 - 2.0 * f); // smoothstep curve

    let a = hash(i);
    let b = hash(i + vec2<f32>(1.0, 0.0));
    let c = hash(i + vec2<f32>(0.0, 1.0));
    let d = hash(i + vec2<f32>(1.0, 1.0));

    return mix(mix(a, b, u.x), mix(c, d, u.x), u.y);
}

// Fractal Brownian Motion: Layering noise for detail
fn fbm(p: vec2<f32>) -> f32 {
    var value = 0.0;
    var amp = 0.5;
    var freq = 1.0;
    var p_iter = p;

    // 3 layers of noise
    for (var i = 0; i < 3; i++) {
        value += noise(p_iter) * amp;
        p_iter *= 2.0;
        amp *= 0.5;
    }
    return value;
}

@fragment
fn fragment(in: VertexOutput) -> @location(0) vec4<f32> {
    let time = globals.time * material.speed;

    // 1. CREATE THE CURTAIN SHAPE
    // We distort the UV.x coordinate with large sine waves to make the
    // whole curtain wind back and forth like a snake.
    let curtain_curve = sin(in.uv.x * 2.0 - time * 0.5) * 0.2
                      + sin(in.uv.x * 5.0 + time * 0.2) * 0.1;

    // We define "height" as the distance from this winding curve.
    // This bends our coordinate system.
    let curve_uv = vec2<f32>(in.uv.x, in.uv.y - curtain_curve * material.curtain_waviness);

    // 2. GENERATE VERTICAL RAYS
    // We stretch the noise heavily on the Y axis (multiplying X by density, Y by 1.0)
    // This creates long vertical streaks instead of round blobs.
    let ray_uv = vec2<f32>(
        curve_uv.x * material.ray_density + time * 0.1,
        curve_uv.y
    );
    let rays = fbm(ray_uv);

    // 3. VERTICAL FADE (The "Mask")
    // Auroras fade out at the bottom and top.
    // We use smoothstep on the Y coordinate to create a soft band.
    let bottom_fade = smoothstep(0.0, 0.2, in.uv.y);
    let top_fade = 1.0 - smoothstep(0.6, 1.0, in.uv.y);
    let alpha_mask = bottom_fade * top_fade;

    // 4. COLOR GRADIENT (Altitude)
    // Map color based on height (Y).
    // Green at the bottom (0.0), Purple/Red at the top (1.0).
    let gradient_t = smoothstep(0.2, 0.8, in.uv.y);
    let aurora_color = mix(material.base_color.rgb, material.top_color.rgb, gradient_t);

    // 5. COMBINE
    // Multiply color by the rays and the alpha mask.
    // We boost the brightness (rays * 2.0) to make it glow.
    let final_color = aurora_color * rays * 2.0;
    let final_alpha = rays * alpha_mask;

    return vec4<f32>(final_color, final_alpha);
}
The Rust Material (src/materials/d03_04_aurora.rs)
This struct maps our shader uniforms to Rust types. Note the alpha_mode implementation: setting this to AlphaMode::Blend is crucial. Without it, our shader would render as an opaque block, blacking out anything behind it. By enabling blending, we tell the pipeline to mix our output color with the background based on the alpha value we calculated in the shader, creating the ethereal, transparent look of light.
use bevy::prelude::*;
use bevy::render::render_resource::{AsBindGroup, ShaderRef};

#[derive(Asset, TypePath, AsBindGroup, Debug, Clone)]
pub struct AuroraMaterial {
    #[uniform(0)]
    pub base_color: LinearRgba,
    #[uniform(0)]
    pub top_color: LinearRgba,
    #[uniform(0)]
    pub speed: f32,
    #[uniform(0)]
    pub curtain_waviness: f32,
    #[uniform(0)]
    pub ray_density: f32,
}

impl Default for AuroraMaterial {
    fn default() -> Self {
        Self {
            base_color: LinearRgba::new(0.0, 1.0, 0.5, 1.0), // Bright Green
            top_color: LinearRgba::new(0.5, 0.0, 1.0, 1.0),  // Purple
            speed: 0.5,
            curtain_waviness: 0.5,
            ray_density: 10.0,
        }
    }
}

impl Material for AuroraMaterial {
    fn vertex_shader() -> ShaderRef {
        "shaders/d03_04_aurora.wgsl".into()
    }

    fn fragment_shader() -> ShaderRef {
        "shaders/d03_04_aurora.wgsl".into()
    }

    // Essential for the "transparent" look of light in the sky
    fn alpha_mode(&self) -> AlphaMode {
        AlphaMode::Blend
    }
}
Don't forget to add it to src/materials/mod.rs:
pub mod d03_04_aurora;
The Demo Module (src/demos/d03_04_aurora.rs)
To properly showcase the effect, we need more than just a quad in empty space. This demo constructs a scene with a sense of scale:
The Aurora: A large quad placed high in the distance, tilted slightly toward the camera.
The Ruins: We generate a ring of large, rectangular stone monoliths in the foreground. These silhouettes create a "Stonehenge-like" frame for the sky, adding parallax and contrast.
The Lighting: We use a very dim AmbientLight so the stones are visible as silhouettes, preserving the ominous night-time atmosphere.
use crate::materials::d03_04_aurora::AuroraMaterial;
use bevy::prelude::*;
use std::f32::consts::TAU;

pub fn run() {
    App::new()
        .add_plugins(DefaultPlugins)
        .add_plugins(MaterialPlugin::<AuroraMaterial>::default())
        .add_systems(Startup, setup)
        .add_systems(Update, (update_ui, handle_input))
        .run();
}

fn setup(
    mut commands: Commands,
    mut meshes: ResMut<Assets<Mesh>>,
    mut materials: ResMut<Assets<AuroraMaterial>>,
    mut standard_materials: ResMut<Assets<StandardMaterial>>,
) {
    // 1. The Aurora Curtain (Background)
    commands.spawn((
        Mesh3d(meshes.add(Rectangle::new(40.0, 20.0))), // Made bigger to fill sky
        MeshMaterial3d(materials.add(AuroraMaterial::default())),
        // Pushed back and tilted
        Transform::from_xyz(0.0, 5.0, -15.0).with_rotation(Quat::from_rotation_x(-0.2)),
    ));

    // 2. The Ground (Foreground)
    commands.spawn((
        Mesh3d(meshes.add(Plane3d::default().mesh().size(50.0, 50.0))),
        MeshMaterial3d(standard_materials.add(StandardMaterial {
            base_color: Color::srgb(0.01, 0.01, 0.02), // Very dark blue-black
            perceptual_roughness: 1.0,
            ..default()
        })),
        Transform::from_xyz(0.0, -2.0, 0.0),
    ));

    // 3. Stonehenge Ring (Silhouettes)
    // We use Cuboids instead of Cylinders for a blockier, ancient stone look
    let stone_mesh = meshes.add(Cuboid::new(1.5, 5.0, 1.0));
    let stone_mat = standard_materials.add(StandardMaterial {
        base_color: Color::srgb(0.02, 0.02, 0.02), // Almost black
        perceptual_roughness: 1.0, // Rough stone
        ..default()
    });

    let radius = 10.0;
    let stone_count = 12;

    for i in 0..stone_count {
        let angle = (i as f32 / stone_count as f32) * TAU;
        let x = angle.cos() * radius;
        let z = angle.sin() * radius;

        commands.spawn((
            Mesh3d(stone_mesh.clone()),
            MeshMaterial3d(stone_mat.clone()),
            Transform::from_xyz(x, 0.5, z)
                // Rotate the stone to face the center of the circle
                .looking_at(Vec3::ZERO, Vec3::Y),
        ));
    }

    // 4. Lighting (Subtle)
    commands.insert_resource(AmbientLight {
        color: Color::srgb(0.05, 0.05, 0.1),
        brightness: 100.0,
        ..default()
    });

    // 5. Camera
    commands.spawn((
        Camera3d::default(),
        // Center of the circle, looking up at the sky through the stones
        Transform::from_xyz(0.0, 0.0, 6.0).looking_at(Vec3::new(0.0, 4.0, -10.0), Vec3::Y),
    ));

    // 6. UI
    commands.spawn((
        Text::new(
            "[Q/A] Speed | [W/S] Ray Density | [E/D] Waviness\n\
             \n\
             Speed: 1.00\n\
             Ray Density: 12.00\n\
             Waviness: 1.00",
        ),
        Node {
            position_type: PositionType::Absolute,
            top: Val::Px(10.0),
            left: Val::Px(10.0),
            padding: UiRect::all(Val::Px(10.0)),
            ..default()
        },
        TextFont {
            font_size: 16.0,
            ..default()
        },
        TextColor(Color::WHITE),
        BackgroundColor(Color::srgba(0.0, 0.0, 0.0, 0.7)),
    ));
}

fn handle_input(
    keyboard: Res<ButtonInput<KeyCode>>,
    mut materials: ResMut<Assets<AuroraMaterial>>,
    time: Res<Time>,
) {
    let delta = time.delta_secs();

    for (_, material) in materials.iter_mut() {
        // Speed Control
        if keyboard.pressed(KeyCode::KeyQ) { material.speed += delta; }
        if keyboard.pressed(KeyCode::KeyA) { material.speed -= delta; }

        // Ray Density (The "Streaks")
        if keyboard.pressed(KeyCode::KeyW) { material.ray_density += delta * 5.0; }
        if keyboard.pressed(KeyCode::KeyS) { material.ray_density -= delta * 5.0; }

        // Curtain Waviness (The "Snake" shape)
        if keyboard.pressed(KeyCode::KeyE) { material.curtain_waviness += delta; }
        if keyboard.pressed(KeyCode::KeyD) { material.curtain_waviness -= delta; }
    }
}

fn update_ui(
    materials: Res<Assets<AuroraMaterial>>,
    mut text_query: Query<&mut Text>,
) {
    if let Some((_, material)) = materials.iter().next() {
        for mut text in text_query.iter_mut() {
            **text = format!(
                "[Q/A] Speed | [W/S] Ray Density | [E/D] Waviness\n\
                 \n\
                 Speed: {:.2}\n\
                 Ray Density: {:.2}\n\
                 Waviness: {:.2}",
                material.speed,
                material.ray_density,
                material.curtain_waviness
            );
        }
    }
}
Don't forget to add it to src/demos/mod.rs:
pub mod d03_04_aurora;
And register it in src/main.rs:
Demo {
    number: "3.4",
    title: "Gradients & Aurora",
    run: demos::d03_04_aurora::run,
},
Running the Demo
When you run the demo, you should see a glowing, shimmering curtain of light with distinct vertical streaks. The bottom should be a vibrant green fading into a deep purple at the top.
Controls
| Key | Action | Effect |
| Q / A | Speed +/- | Controls how fast the aurora undulates and shimmers. |
| W / S | Density +/- | Increases or decreases the number of vertical rays. High values look like energetic rain; low values look like soft clouds. |
| E / D | Waviness +/- | Controls how much the curtain curves. Set to 0 for a straight wall of light, or high for a very twisted path. |
What You're Seeing

The Curtain Shape: Notice how the entire wall of light moves back and forth. This is the
curtain_curvein the shader effectively moving theycoordinate based on thexposition.The Rays: The vertical lines are created by the
fbmnoise. Because we multiply thexcoordinate byray_density(e.g., 10.0) but leaveyalone, the noise stretches vertically.The Gradient: The color shift from Green to Purple is purely a function of the Y-axis (altitude), interpolated with
smoothstep.
Key Takeaways
mix()is your best friend: Almost every smooth transition in graphics - whether it's color, position, or opacity - is built on linear interpolation.smoothstep()adds the polish: Replacing linear transitions with S-curves makes procedural effects look organic and high-quality.Math is Logic: You can build complex logic using simple math functions. A radial gradient is just
distance(); an angled gradient is justdot().Coordinates are Malleable: As seen in the Aurora, you don't have to accept UV coordinates as they are. You can bend, twist, and stretch them to create complex shapes from simple noise.
Dithering matters: When working with subtle dark gradients, always keep banding in mind. A little bit of noise goes a long way.
What's Next?
We've mastered patterns and gradients, but so far everything has been mathematically generated. What if we want to use actual images - photos of bricks, wood, or metal? In the next phase, we unlock the power of Textures, learning how to load images into Bevy and sample them in our shaders.
Next up: 3.5 - Distance Functions
Quick Reference
Linear Interpolation (Lerp)
let result = mix(start, end, t); // t is 0.0 to 1.0
Smooth Transitions
// Returns 0.0 if x < 0.2, 1.0 if x > 0.8, smooth curve in between
let t = smoothstep(0.2, 0.8, x);
Radial Gradient
let dist = distance(uv, center);
let glow = 1.0 - smoothstep(0.0, radius, dist);
Angled Gradient
let dir = vec2<f32>(cos(angle), sin(angle));
let t = dot(uv - 0.5, dir) + 0.5;
Procedural Dithering
let noise = fract(sin(dot(uv, vec2(12.9898, 78.233))) * 43758.5453);
let dithered_color = color + (noise - 0.5) / 255.0;


